In such a highly competitive industry, it is imperative that your work stands out from the crowd. Unfortunately, great models can be overlooked due to poor presentation. It is for this reason that we should consider how we present our work, especially if we are trying to catch the eye of potential employers.
Let’s look at an example of good presentation:

Hugh Holder’s ‘Gabriel Costume‘ Model
The presentation of this work is excellent. It uses good lighting, is clean and simple and provides all the information that a potential employer may be looking for. To fully understand how to correctly present a model, I will take a look at the different aspects the make up good presentation.
IN PRACTICE
When presenting a model there are two main sets of images that you will be producing: some form of turnaround (with texture, wireframe etc.) and a display render (which may be a posed or action shot render). The latter is more of a splash image that looks awesome and might show a character in a cool pose or a building from a dramatic angle. It is designed to catch the eye but might not convey all the information or even display the whole model: this is the job of the turnaround. In both cases lighting is essential but you might use different setups for each. An example is below:
The display render uses washed out, pink lighting:

While the turnaround render uses natural colored, standard 3 point lighting:

So with this in mind let’s take a look at lighting.
Lighting is of the most critical aspect for presenting a model. Models exist in 3D space so we expect them to interact with both light and shadow. In the case of the turnaround, the lighting should help pick up on the model’s details and give it enough depth while still making the image readable. Conversely, the display render can utilize more extreme lighting in order to enhance certain aspects of the model or to convey something about it.
LIGHTING THE TURNAROUND:
When lighting the turnaround of a character, 3 point lighting is most commonly used as it nicely defines the model without being too extreme (Marmoset, 2016).
Just as the name suggests, 3-point lighting consists of three different lights: a key light, fill light and rim light. These are defined below:
- Key light: the main light source – has a high intensity
- Fill light: the secondary source which ‘fills’ in the shadows created by the key light – has a low intensity (half that of the key light)
- Rim light / Back light: placed behind the subject, this light lights the rim edges of the model – has a very high intensity (double that of the key light)
(Marmoset, 2016).
The following GIF demonstrates the effect that each of these lights have:

For this to work correctly, the lights need to be placed in the proper way: the key light in front of the subject on a 45 degree angle (left or right of the camera); the rim light placed behind the subject, opposite to the camera; and the fill light placed in front of the subject on a 45 degree angle (on the side of camera opposite to the key light). This is shown below:

Additionally, a coloured ambient light can be used to help create atmosphere. Using this setup allows the model to be shown cleanly while still having depth.
EXTRA POINTERS FOR THE TURNAROUND:
A plain coloured background is standard for the turnaround. Pure black or white do not look as good as they are a little extreme. Additionally, a HDRI map can be used to simulate an environment and give greater depth to specular reflections.
For the turnaround it is much better if the model seems grounded in some way: whether this be by having the model sit on a stand or having them cast shadows onto the ground. This helps to establish their physicality and generally looks neater. See the example below:

If multiple turnarounds are going to be created (one with a beauty pass, one a wireframe, one with the normal map etc.) the same lighting setup and background should be used as it helps with consistency and overall cleanness of the composition.
LIGHTING THE DISPLAY IMAGE:
Just as in film and photography, lighting is one small aspect of the overall piece that contributes to both the implied narrative and composition (Blender Guru, 2016). The choice of colour and the positioning and intensity of the lights helps to create an atmosphere and set the mood. Lighting should suit the subject matter (whether it be a character, object or environment) and convey some additional information (whether that be personality, setting, time of day or emotion) (Blender Guru, 2016).
The Blender Guru (2016) states that we should consider 5 points when setting up the lighting:
- What is the purpose of the render?
- Is there a implied narrative or story to this image?
- What is the focal point?
- What mood are you trying to convey?
- What lighting style would achieve and suit the above answers?
In the example below, see how the use of purple and teal lighting helps give the astronaut model a sci-fi feel and establishes the outer-space setting. This simple choice helps to set the scene and suits the character of the astronaut:

Model by Frederik A. Plucinski
If a piece is moody and dramatic, dark high-contrast lighting might be the way to go. Note how the shadows obscure Batman’s face to help show that he is brooding and mysterious, while the light catches on his bat ears and muscles thus drawing the viewer’s eye:

Model by Maxime Gainche
Similarly the dark lighting with sharp highlights help to give this sci-fi interior an ominous atmosphere:

Model by Kai Du
On the other hand, a more light-hearted piece might require softer, brighter lighting. Note how the soft lighting on the body and face helps to establish Fiona as a bright and open character:

Model by Vincent Dromart
Similarly, the soft, warm lighting and use of bloom helps convey a calm and pleasant mood:

Model by Encho Enchev
Carefully considering what you are going for with the display render and adjusting the colouring, positioning and intensity of the lights to suit will help to give the final render much more visual impact.
EXTRA THINGS TO CONSIDER FOR THE DISPLAY IMAGE:
- The posing of the character (if applicable)
- The background – this should suit the mood, story, personality or setting.
- Framing – this should suit the mood, story, personality or setting.
- Overall composition
PRESENTING WORK ONLINE
Flipping through Artstation, I have noticed a couple of things. I find that the best or most ‘viewable’ 3D character models are ones that contain multiple images. I ones that catch my eye usually contain around 5 – 8 items and include:
1) A display image: a high quality render of the (posed) model with approiprate lighting and background

Model by Per Haagensen
2) A full length turnaround of the character with textures and 3 point lighting

Model by Hugh Holder
3) Full length turnaround of the character with a wire frame

Model by Miles Wadsworth
4) Close ups of details

Model by Blair Armitage
5) Sketchfab or Marmoset viewer
Additionally, some artists may include a video showing an animation or turn-around, some development work, a breakdown of the design, a breakdown of the textures/maps or some concept art. Including these help show the process by which the model was created.
Model by Andy Chin
It should be noted that while this format works well for characters, other models, such as environments, may take a different format but usually include a high quality version, textured version, wireframe version and close ups.

Model by Tim Moreels
I feel that this is a pretty good format to present the model as it catches the viewer’s eye, lets them quickly see all the information in 2D and then lets them view the model in 3D. It allows a potential employer to view everything they need without have to scroll excessively.
For this reason, I will try to post my finished model on Artstation using this format (although I may not have the texturing finalised until the holidays).
SOME EXTRA POINTERS:
- Have your name and contact details written legibly and discreetly on the bottom of the image and don’t use watermarks (Anhut, 2014).
- Be clear if it was a group project, give credit where it is due and detail your role and work in the project.
- Keep the overall presentation clean and simple.
SOME OUTSTANDING ARTSTATION EXAMPLES:
- “The Surgeon” by Frederik A. Plucinski
- “R.I.P Force: Cyborg and Monocycle” by Charles Metze III
- “Gabriel Costume” by Hugh Holder [this one is a bit longer but includes 3D modelling]
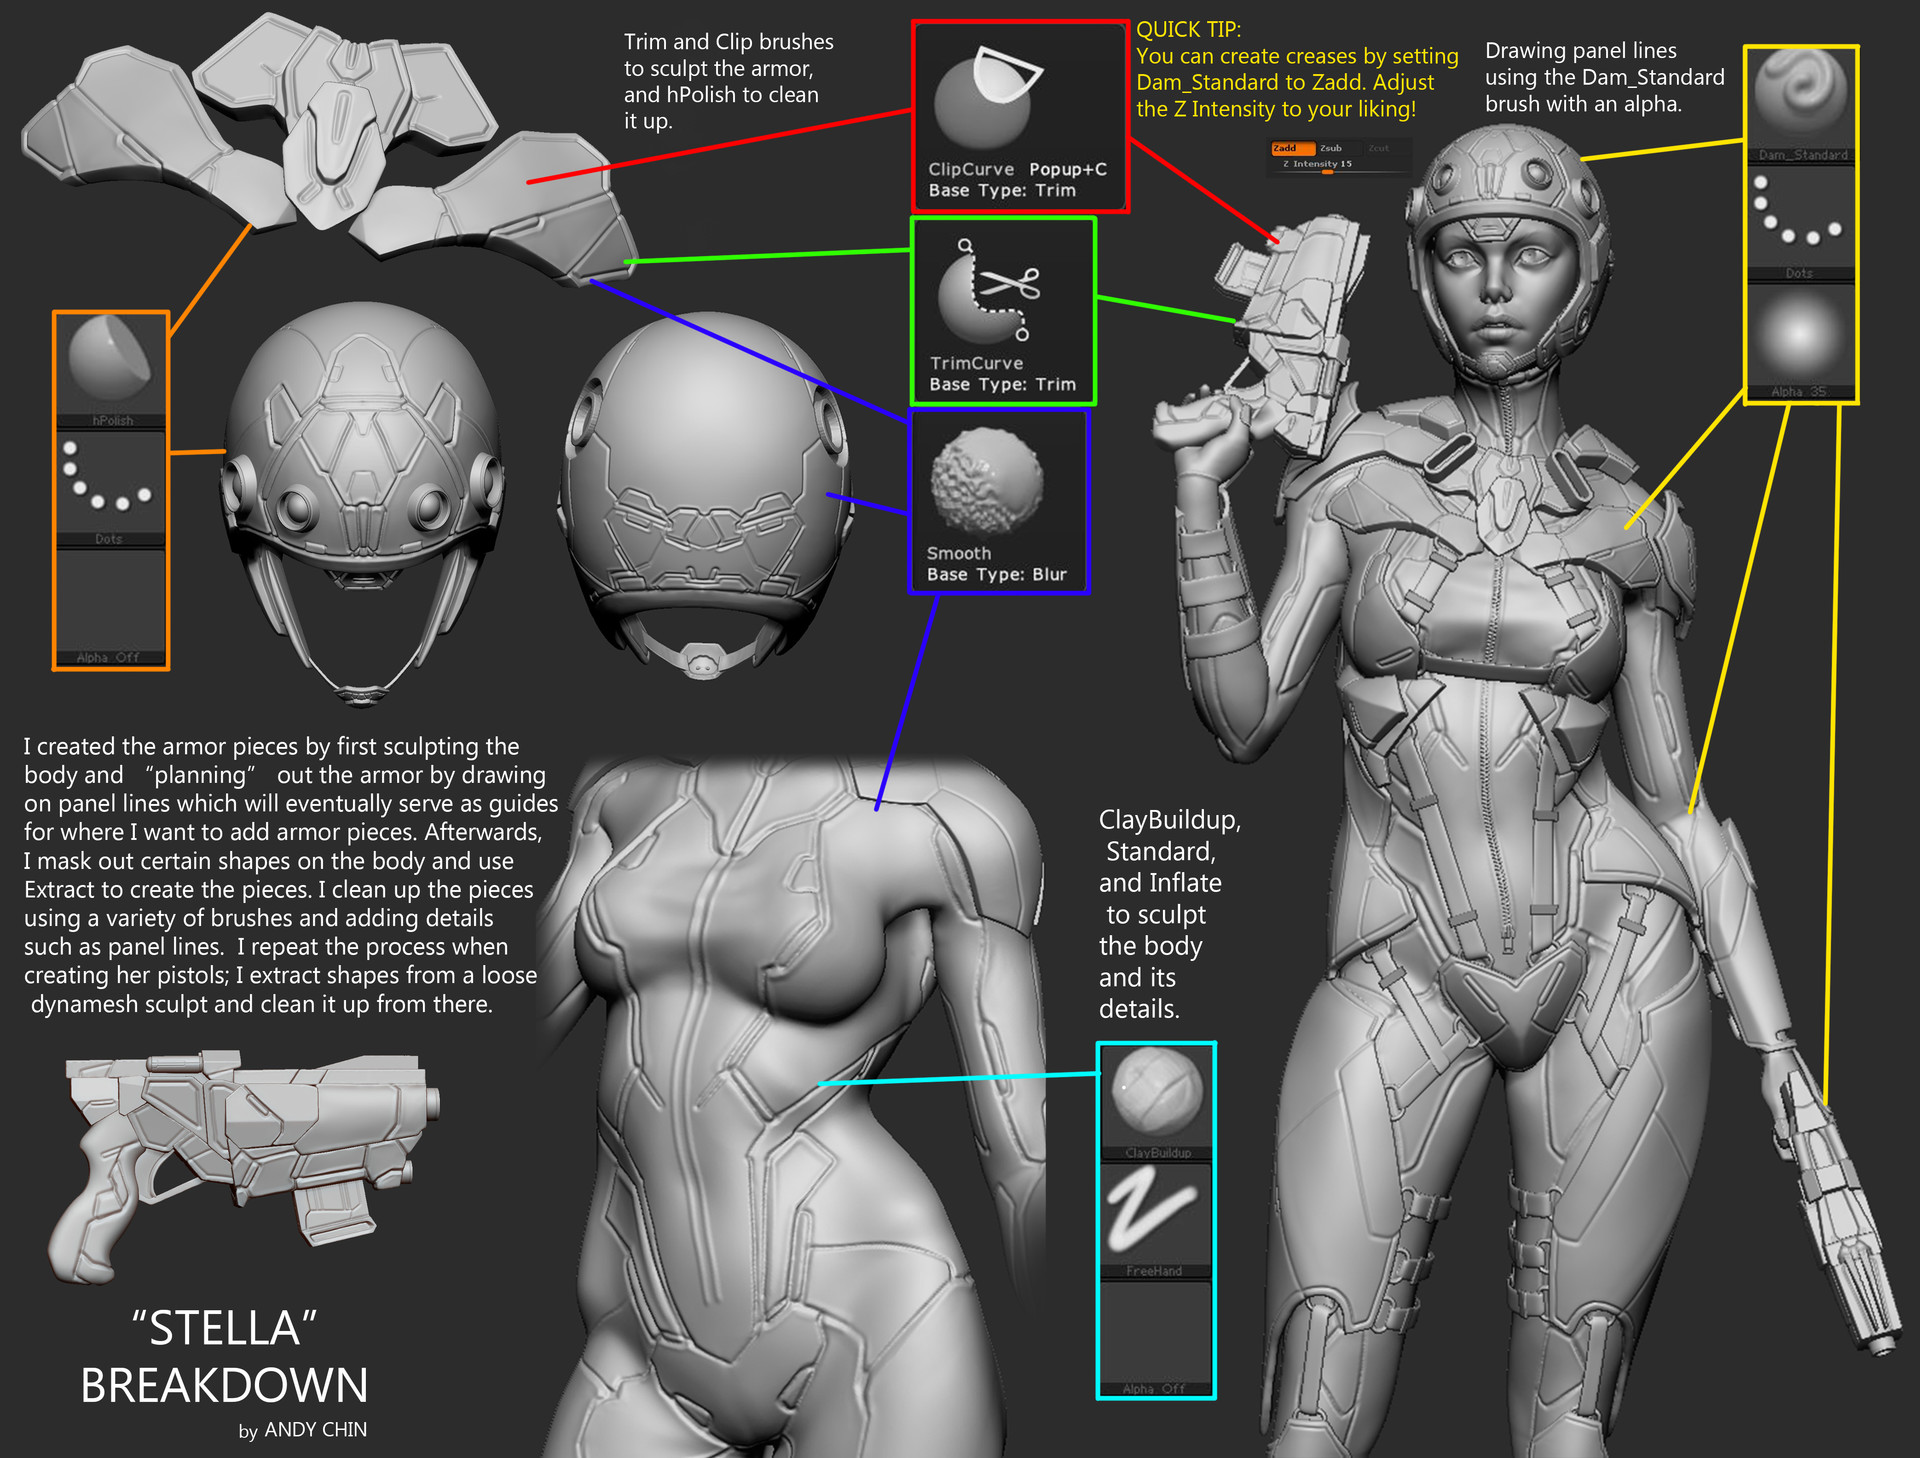
- “STELLA” by Andy Chin
- “Ye Olde Fisherman’s Outpost” by Tim Moreels
PRESENTING WORK IN A SHOWREEL
There are no hard and fast rules for displaying models in a showreel. However, after looking around a bit I have found what I would consider a good format in which to display a model.
1) A display render (can just be a still) with nice lighting and a background
Model by Aditya Parab
2) A full-length beauty turnaround

Model by Aditya Parab
3) A full-length gray/clay turnaround

Model by Aditya Parab
4) A full-length wireframe turnaround

Model by Aditya Parab
5) A slower, closeup turnaround
Alternatively, several turnarounds may be shown at once. This is very effective and helps cut down the time of the showreel:

Model by Patrick Kilcher
Overall, it looks professional if the showreel is kept nice and short with clean transitions between the different turnarounds or models.
Of course, what you choose to display may depend on what job you are aiming for or what you are trying to showcase. More closeup shots or even closeup stills might be needed to display a particular detail. Some artists may also like to showcase their concept art, texture maps, rigging or animation.

Model by Aditya Parab
This format allows the artist to quickly showcase the model and display all necessary information, such as topography and textures, to the viewers. I will definately be using this format when putting together my showreel.
SOME EXTRA POINTERS:
- Keep the overall presentation clean, simple and consistent.
- Ground the model by using a stand or having them cast shadows.
- If necessary, include project details such as time taken or polygon count.
- Have your name and contact details displayed legibly and cleanly without extreme motion graphics or effects.
- Be clear if it was a group project, give credit where it is due and detail your role and work in the project.
- Do not use obnoxious music.
SOME GOOD EXAMPLES OF SHOWREELS:
- “3D Modeling Demoreel” by Jose Augusto
- “Character Modeling and Texturing Showreel” 2014 by Aditya Parab
- “Character Modeling Demo Reel 2014” by Patrick Kilcher
MY PROJECT
For my specialisation project, I am creating a textured character model that will be eventually displayed both in my showreel and online (on Artstation). I am planning on using 3-point lighting and a HDRI map for the environment to render my beauty, wireframe and clay turnarounds. Using Premiere Pro I will be create a nice transition between them to put into my showreel. Eventually I would like to rig and pose my character for a display image but will not be doing that this trimester due to lack of time.
Below is my camera and light setup for the full length turnaround:

I have used three direct lights for the key, fill and rim lights; one skylight (as an ambient light) and a camera. These have all been linked to the dummy in the center so that it is the only object I have to animate in order to create the turnaround.

Below is a render of my (unfinished) model without the three-point lighting:

And the following image is a render with the three-point lighting:

When comparing these images, it is evident how much flatter the first is compared to the one with three-point lighting. I can see how much of a difference using 3-point lighting makes as it helps the model ‘pop’ and gives a greater sense of depth. I will definitely be using this lighting setup to render my models in the future.
REFERENCES
Anhut, A. (2014). How To Build Your Portfolio?. Retrieved 7th May, 2016 from
howtonotsuckatgamedesign.com/2014/11/reader-question-portfolio/
Blender Guru. (2016). How To Correctly Light a 3d Model. Retrieved 7th May, 2016 from
http://www.youtube.com/watch?v=7o0PauhFQyo
Marmoset. (2015). Character Lighting Tutorial. Retrieved 7th May, 2016 from
http://www.marmoset.co/toolbag/learn/character-lighting
