I choose to integrate sound with my run animation inside the Unreal engine. I did this through the blueprint and notify systems. Firstly, I grabbed a couple of free sound effects and imported them into my project (quickly learning that a whole bunch of file types are not supported).
Then I dropped in some background ambience. This was very easy but required a blueprint setup because I wanted it to loop.
I then opened up my run animation, worked out where the sound should be played and set a ‘notify’ on the correct frame. This notify allowed me to attach a sound file (in this case a footstep) to the animation frame where she makes contact with the ground.
In addition to this, I added a gong sound effect to the beacons activating. This was a little more complicated and required using Blueprints (Unreal’s node based scripting) to get it working properly.
Finally, I made a musical sound play once all the beacons had been found. Again, this was much more complicated. Ben and I went through a couple of tutorials to work out how exactly that could be done.
The video below shows how the sounds work in the ‘game’.
These sound effects are not perfect at all but it does helps make the scene feel complete.
Having finally finished my character and created some very rough, very basic animations I began the process of setting everything up in Unreal. As I hope to work on games in the future, and because the game industry in Australia requires you to be an all-rounder, I decided to start from scratch and setup a character without using any of the templates. To do this I followed a comprehensive tutorial on the Unreal site.
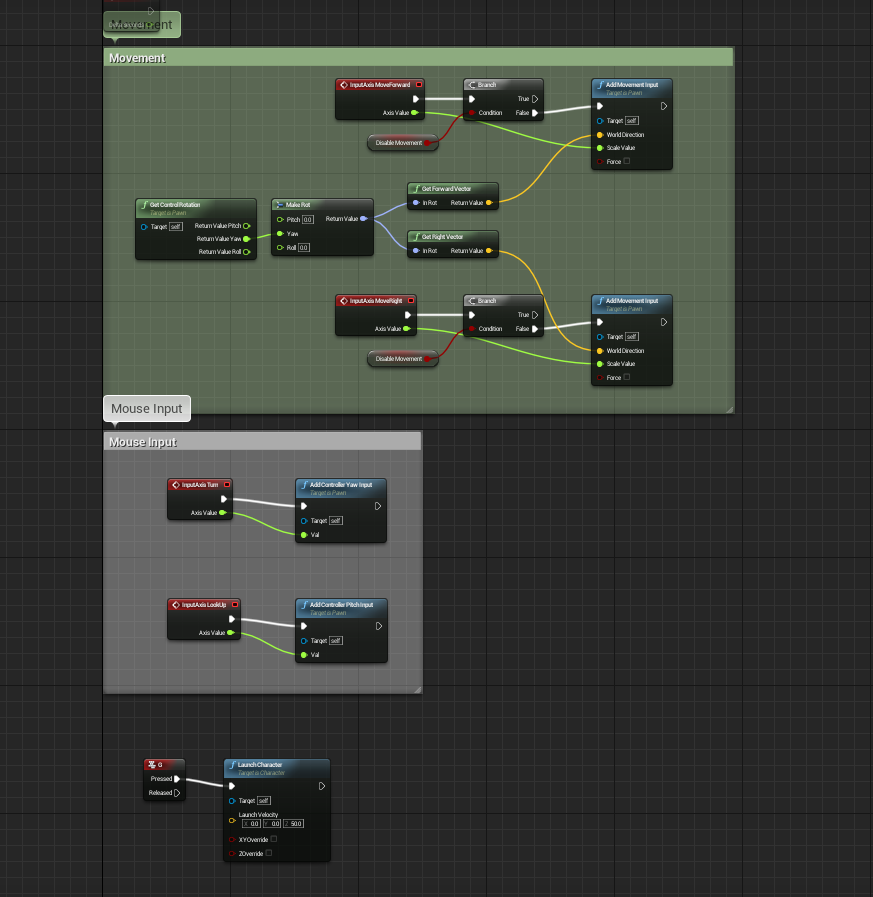
The movement and control setup for my character
Through this tutorial I learnt how to set up a character, a camera, controls and animation using Blueprints (Unreal’s version of scripting). In hindsight I should have set up a different type of camera as the one I currently have highlights the lack of strafing animation. I did look into changing this but it required much more complicated Blueprint work and I currently lack the time to learn this.
The camera setup
The animation system is really cool and allows you to smoothly blend between different animations depending on the player’s speed or direction. As I just had a shitty idle animation and a basic run, my blend space was really simple.
The blend space between the idle and run
While this was all relatively straight forward it was time consuming and fiddly. For example, after everything was finally set up, my animations would not work. I checked and double checked everything but nothing fixed the issue. Finally I found a single node that had not been linked up.
Environment
Once I had a moving character, I decided to create an environment for her to move through. At first I planned to use just a basic plane but decided a small labyrinth would be much cooler. I quickly created a labyrinth in 3DsMax and imported into the game.
I then set about creating collision boxes for all the walls and the floor. This was quite fiddly and took some time as I had to individual place and size each collision box. Additionally, the camera seemed to interact weirdly with the collision boxes (like shaking when the player went to close to a wall).
Individually placed collision boxes (purple)
This was due to the collision boxes being slightly larger than the walls. I was then informed that, with a single click, you can use an objects faces as its collision boxes but it is much heavier when playing the game. As my game is very light to run, I decided to use this method. This basically fixed the issues with the camera.
Finally, I was able to run around the maze.
Interactables and Particles
At this point I decided that game was too empty and I needed something for players to interact with. Using the shapes (Unreal’s equivalent of primitives) I placed several pyramids around the maze as something for the player to find.
I wanted a glowy particle effect to be trigger when the player got close to the pyramid. To do this, I first created my own particle effect. Using the default fire as a base, I stripped out all the emitters except for the embers and tweaked the settings until I was happy with it.
Particle editor and viewport in Unreal
I then set up a collision box as a trigger around the pyramid. This was set it up so that once the player tripped the trigger the particles would activate and a sound of a gong would play.
Beacon with particles and collision box
Graphic User Interface (GUI)
Finally, I wanted to include some UI elements into the game to give it some sort of objective. This was done almost entirely through the blueprint system. Below is the final UI setup I have used in the game.
Firstly, I added a ‘counter’ that essentially counted how many beacons were active out of the total number of beacons. (The UI and interactables are set up in a way so that I can add more beacons and the UI and end state will adjust to suit). This required some complex blueprint work.
Then, with Ben’s help, I added some end game text. It simply says “All pyramids found!”. The trick was to have it hidden until the number of beacons activated matched the total number of beacons. Again, this was a little more complicated.
Lastly, I set up a timer so that the player can see how long it took them to complete the game. Once again I used blueprints to complete this.
Final Outcome
With all of these elements in, I had created an extremely basic game. It is not perfect and not even a vertical slice of a real game. However, I have achieved my goal: complete a game character production pipeline from design to implemention.
Below is a video of the gameplay as it currently is. I need to still add in a couple of things like a start menu, exit button and a skybox.
Through the course of my game character project I have kept the following technical specifications in mind so that my assets work efficiently in the Unreal game engine.
Polycount
Throughout my entire game character project I have been mindful of how my assets will import and run in a game engine. For this reason I have kept everything to a relatively low poly. My character is around 3000 polys which I should have reduced more, especially in the eyes and horns.
My environment (a quickly created labyrinth) was originally over 8000 polys which I managed to reduce to around 300 polys.
While the poly count is not going to be so critical in my mini demo/test it was good practice for the future as larger projects will require stricter poly counts.
The Importance of Resetting X-Forms
I had a couple of issues with importing my labyrinth file into the Unreal engine as I had forgotten to reset my X-forms. Once I had worked this out and fixed it everything went smoothly but it is something I will need to remember for the future.
Exporting and Importing FBX Files
Once my character was finished and had a basic run and idle animation I exported it into the Unreal engine. I did this by exporting the two animations as separate FBX files where the animation was baked in. This worked well when I imported the animations: when importing FBX files Unreal asks you if it is a skeletal mesh and, if so, does share a skeleton with one already in the project.
This allowed me to use the same skeleton for the run and idle animations which enabled me to create a blend space between the two.
Exporting and importing the labyrinth was even simpler as I exported as a FBX (with no animation) and imported it as a static mesh.
Iterative Files
The Unreal engine has the ability to update assets currently in the scene with a newly imported asset. All that is required is for it to have the same file name (you can also do it manually if you have differently named files). For this reason I kept a standard naming convention for my files allowing me to quickly and easily update my textures and animations.
So, after finishing the rig, I began the horrible next step: skinning. I hate skinning because it is fiddly, tedious and never seems to work for me.
However, Steve told me about the Geodesic Voxel Binding and Heatmap tools in 3DsMax 2016. These tools are not included in the main download of Max but you can get them if you install the Service Package 1 and then Extension 1.
The Geodesic voxel binding is magic and literally saved me an hour or so of correcting vertex weights. It is included inside the Skin modifier. That is, you simply add a Skin modifier and add the bones (as you normally would). With no settings adjusted, the modifier will attempt to mold the mesh to the bones but is usually very inaccurate.
To use the Geodesic voxel binding you scroll down to Weight Properties, select Voxel and click the little “…” box on the right. Another dialogue box should appear. With this you can control the falloff of the binding and the maximum number of bones that can have an influence on any given vertex (if you leave it as 0 the program will work out if out for you). You can also just the “accuracy” of the binding, 64 being the lowest.
I tested this on my model with the default settings at the lowest resolution.
As you can see it has already fixed one of the biggest issues. Of course, it still needs much adjusting. I fiddled around with the voxel binding settings until I found something that worked and applied that to my model at a high resolution. From there I adjusted the individual vertex weights in the problem areas until I had fixed all the issues.
Below is a short video of my skinned model:
After uploading this, I noticed an issue with the belt and the hip moving inwards and clipping through the body. I have since fixed these problems.
I am continuing to work through the production pipeline of creating a game character. Having finished the modelling stage, I moved onto the next step: rigging.
Initially I had hoped to create a skeleton in Maya and then create a rig. However, as I have not used Maya before, this proved extremely difficult, frustrating and I was running out of time. So, in order to be able to finish this pipeline this Trimester, I have instead created a custom CAT in 3DsMax. This was much more efficient as I have worked with CAT rigs before.
I began by adding a CAT parent.Then I added a hub bone (the pelvis) and some legs. The CAT system is really effective because if you create one leg in full you can simply copy and “paste mirror” for the other leg.
I then continued to add bones for the rest of the body. Including all the finger bones and an additional bone for her bag. I made sure to colour the bones in a way that makes it easy to see what is what: the left side is pink, right side is green, central bones are blue and the bag is yellow.
From here, I added up-nodes, gizmos and IK targets to allow for easy animation. Again, I made sure to keep the same colour system. I like to make sure that the controllers are larger than the model, so that there will be no issues when animating (such as being unable to find a finger gizmo).
I created extra gizmos around the knee and elbow up-nodes, so they are easy to see and grab. Additionally, I used squares for the knees and circles for the elbows, as I have had issues in the past when they get mixed up.
I added text to the hand IK targets and made them slightly brighter shades of green and pink so that they are easy to find and use.
Finally, I added a rectangle gizmo to the shoulders. These will help to see what position the shoulders are current in (as horizontal is the neutral or starting position).
Finally, my custom, animation-friendly rig is finished and ready for me to use.
For my game character I plan on animating four basic actions: idle, walk, run and jump. These animations are the minimum requirement for most video games and would also fulfill the brief. From these actions I created my animation breakdown list (which can be found in my student folder):

 In addition to this, I added a gong sound effect to the beacons activating. This was a little more complicated and required using Blueprints (Unreal’s node based scripting) to get it working properly.
 The video below shows how the sounds work in the ‘game’.